Alongside the marathon and Ironman training, I’ve been trying to focus on my master’s thesis, but have spent plenty of time working on aspects of the house, like finding furniture, browsing for chandeliers and figuring out how to marry two divergent styles without an unstylish spat.
Good luck with that.
One thing we did agree on, however, was that the long wall of our dining and living rooms needed some intrigue. We talked about tall mirrors and wall art, but nothing maximized the space and took boring to new heights.
And then we found what we were looking faux…
Moulding! First, I priced out real, wooden crown moulding for the walls and ceiling, for which I had budgeted doing the labor myself. That turned out to be a little scary. But as I googled for instructions about installing moulding, I stumbled on a better idea: faux moulding.
The French call it trompe l’oeil, or trick the eye. I call it a neat idea. Not only did it provide us with a doable solution for the long, boring wall, it’s a semi-permanent solution that wouldn’t be devastating if we changed our minds.
Plus, I already knew how to do it.
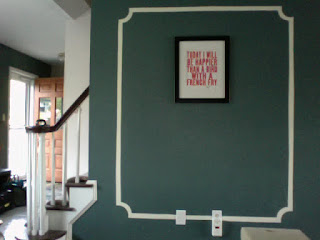
Starting with a small wall (across from the big one), I measured and marked with chalk a large rectangle, whose sides were each six inches from the edges. Then I used my cell phone to mark the lines a couple inches thick all the way around, and then a soup bowl from the kitchen to round the edges. I taped off the chalked frame, painted with a contrasty off-white and came out with this:
 Total time: 40 minutes.
You can imagine how pleased I was with the amount of effort and the great results. Immediately I launched into the big wall. It did not take 40 minutes.
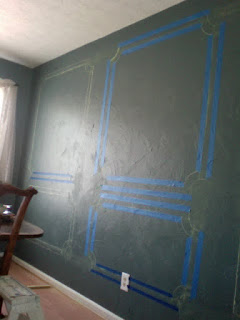
While similar in principle to the small wall, the process for the bigger wall was a bit more complicated. Not only was there much greater surface area, but I had decided to paint double-decker moulding frames… and there were six of them!
Here’s how I did it:
1. Using a tape measure and a 6-inch-wide book, I drew a large rectangle whose sides were six inches from each of the edges.
 2. Then I measured its width in inches and spent at least a day dividing by six, adding for space in between, chalking out the sub-rectangles, finding some error in my calculations and starting over again. I think the error lay mostly in my physical measurements and chalking than the math, and I could have… should have used a level.
3. Taking into account the height of my furniture, I picked a height for the upper and lower frames. I used a yardstick to dot each frame’s edges and then connected the dots to break the large rectangle and sub-rectangles into 12 frames—six tall frames on top, six 1/3-size frames on the bottom.
4. I used my cell phone, again, to mark off the thickness of the frames’ sides, dragging the phone down the drawn rectangles, dotted its edges and then using a yardstick to connect the dots.
5. Making use of my soup bowl again, I rounded the edges, marked thickness with my cell phone again, and used the bowl to draw the outer edges. This step wasn’t difficult, but after having to do it at least 48 times (four corners for each frame!). And I still sometimes have dreams about it at night.

6. I started out taping the entire frames, corners included, just like I did on the small wall, but found that my unsteady hand painted better-looking curved corners, on average, than the taped curves.
7. Paint, paint, paint.
8. Let it dry.
9. Removed the tape and touched up.
10. Enjoyment to the maximus.
While I still have some chalk-cleaning and touch up to do, I can’t tell you how much I have enjoyed the results. The faux moulding isn’t perfect, but adds plenty of intrigue to a long, boring wall with whimsical lines and just enough contrast.
Check out more photos from the process, including how crazed I looked about half way though the chalk job:
 And our colors? Martha Stewart’s Birdhouse in satin Valspar paint walls with Martha Stewart’s Hominy in satin Valspar paint moulding.
In the process, I came up with a number of paint-tape tricks I could have used to make the process much easier. Now I’m eager to paint some patterns and shapes throughout the house. And when I nail down these better processes, I’ll be sure to share.
Check out some BEFORE images on my previous blog post.


0 comments:
Post a Comment